Customizing the IBM Sametime Business Card: Difference between revisions
| Line 730: | Line 730: | ||
I hope this article is useful in your day-to-day work as a Sametime Administrator. | I hope this article is useful in your day-to-day work as a Sametime Administrator. | ||
= Ver também = | = Ver também = | ||
Latest revision as of 12:49, 15 August 2025
I migrated the article "Customizing the IBM Sametime Business Card" from IBM developerWorks, after the sale of Sametime to HCL.
Summary
Having access to information about coworkers in day-to-day work should be quick and easy. This article describes, in a practical way, how to make such information available through the IBM Sametime Connect Client and the IBM Sametime Web Client (Sametime Proxy Server).
Introduction
Our story begins with a multinational company that, a year ago, made IBM Sametime and IBM Connections available to its employees. Today, thanks to these two tools, employees communicate better and more effectively.
One morning, the company’s IT Director returns from a meeting with the Vice President of Marketing. The Marketing Department requested that new information be displayed in the IBM Sametime Business Card.
The IBM Sametime Connect Client and Web Client Business Card displays information about a contact, including Name, Title, Telephone, and even Photos. Users view this information when they are in a Chat window or when they hover the mouse pointer over a contact in the Contact List.
ADD SCREENSHOT WITH BUSINESS CARD
Figure 1: Business Card Screen
The IT Director challenges the IBM Sametime Administrator to meet the following requirements:
1. Add new fields from LDAP;
2. Add fields from the Company’s HR System;
3. Display the user’s photo stored in the IBM Connections Profile;
With these needs in hand, the IBM Sametime Administrator begins the customizations.
1. Adding New Fields from LDAP
By default, the configuration interface of the Sametime System Console Business Card allows you to select which information will be displayed in the Sametime client.
1.1. Changing Attributes through the Sametime System Console
The available attributes are:
- Name
- Company
- Telephone
- Location
- Title
- Photo
Since the Business Card information is obtained from the LDAP Directory to which the IBM Sametime Community Server is connected, we must map the attributes:
| Attribute Name | LDAP Attribute |
|---|---|
| Name | cn |
| Title | title |
| Location | postalAddress |
| Telephone | telephoneNumber |
| E-mail Address | |
| Photo | jpegPhoto |
| Company | ou |
You can change the Business Card through the Sametime System Console.
Follow these steps:
1) Access the Sametime System Console
2) In the navigation panel (on the left), click on Sametime System Console
3) Expand Sametime Servers and click on Sametime Community Servers.
4) Click on the Deployment Plan of the Sametime Community Server.
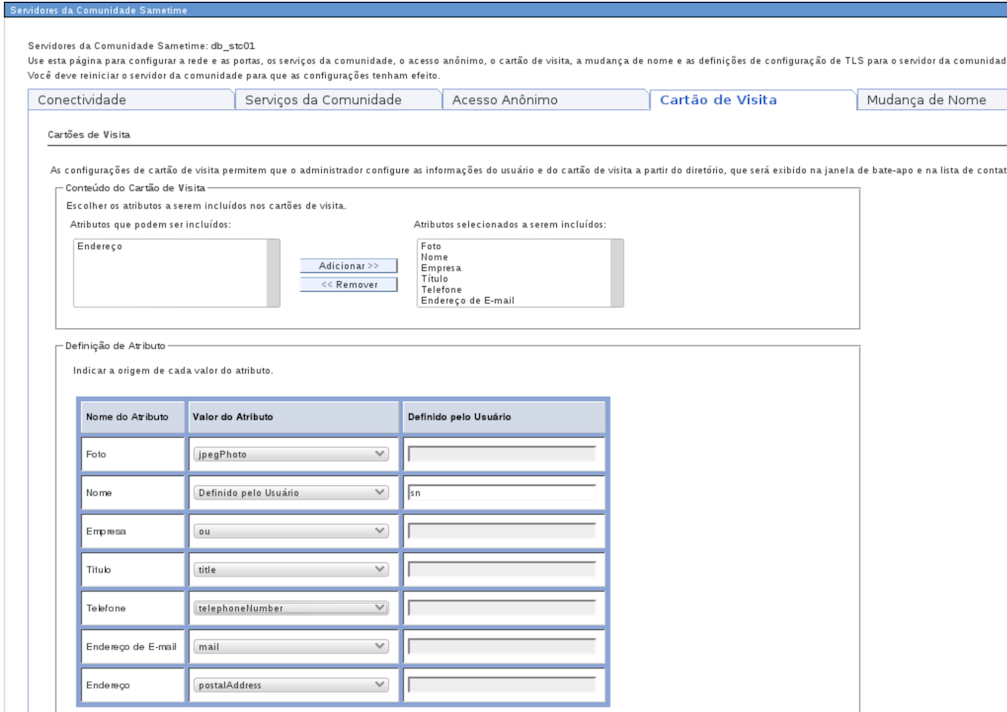
5) Click on the Business Card tab.
6) Change the attributes, click OK to save the settings.
Restart the Sametime Community Server.
Figure 2: Business Card Configuration in the Sametime System Console
Despite the ease of using the Sametime Administration Console, we are limited to the available fields. Moreover, not all user information is stored in a single repository, such as an LDAP directory, due to performance reasons. For example, user photos.
1.2. The Business Card Subsystem
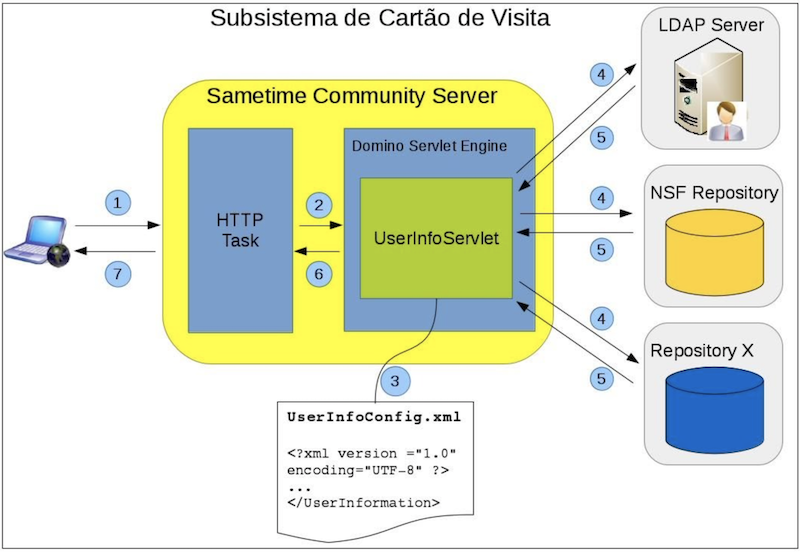
The Business Card subsystem of IBM Sametime retrieves information from the repositories configured in the UserInfoConfig.xml file.
These repositories can be:
- An LDAP directory
- A Notes application
- A Java class, which in turn retrieves information from a SQL database or an ERP/SAP system.
The interface (API) that accesses these repositories is called the BlackBox.
The process of retrieving information by the Client from the repository is described below:
- The Sametime Client makes an HTTP (GET) request to a Sametime Community server.
- When the request reaches the Sametime/Domino HTTP server, Domino redirects the request to the UserInfoServlet servlet.
- The UserInfoServlet servlet reads the UserInfoConfig.xml file, which contains the connection information for the repositories.
- The servlet queries each repository to retrieve the information.
- The data from the repositories is returned to the UserInfo servlet.
- The servlet combines the responses from these repositories and converts them into an XML document.
- The HTTP server sends the XML document to the client, which extracts the data and displays it on the client.
Figure 3: Business Card Configuration in the Sametime System Console
1.3. Adding Attributes via UserInfoConfig.xml
The UserInfoConfig.xml file allows greater flexibility in customizing the data displayed on the Business Card.
The file is generated during the installation of the Sametime Community Server and is located in the following directory (depending on the platform):
MS Windows:
<DOMINO_INSTALL_DIR>\UserInfoConfig.xml
Example: C:\IBM\Domino\UserInfoConfig.xml
Linux/AIX:
<DOMINO_DATA>\UserInfoConfig.xml
Example: /local/notesdata
When opening the UserInfoConfig.xml file, you will basically see two sections:
In the <Storage type="LDAP"> section, we have the connection information to the LDAP server:
<Storage type="LDAP">
<StorageDetails
HostName="ldapserver_hostname" Port="636"
UserName="" Password="" SslEnabled="false" SslPort="636"
BaseDN="" Scope="2"
SearchFilter="(& (objectclass=organizationalPerson)(|(cn=%s)(givenname=%s)(sn=%s)(mail=%s)))" />
<!-- Add another StorageDetails tag to support another LDAP server. The listing order implies the searching order -->
<!-- Scope: 0=OBJECT_SCOPE 1=ONELEVEL_SCOPE 2=SUBTREE_SCOPE-->
Listing 1: Section with LDAP connection information
While in the Details section, we have the mapping between Sametime attributes and LDAP fields:
    <Details>
      <Detail Id="MailAddress" FieldName="mail" Type="text/plain"/>
      <Detail Id="Name" FieldName="cn" Type="text/plain"/>
      <Detail Id="Title" FieldName="title" Type="text/plain"/>
      <Detail Id="Location" FieldName="postalAddress" Type="text/plain"/>
      <Detail Id="Telephone" FieldName="telephoneNumber" Type="text/plain"/>
      <Detail Id="Company" FieldName="ou" Type="text/plain"/>
      <Detail Id="Photo" FieldName="jpegPhoto" Type="image/jpeg"/>
    </Details>
  </Storage>
</Resources>
<ParamsSets>
  <Set SetId="0" params="MailAddress,Name,Title,Location,Telephone,Photo,Company"/>
  <Set SetId="1" params="MailAddress,Name,Title,Location,Telephone,Photo,Company"/>
</ParamsSets>
Listing 2: Section with attribute mappings
We can now start the procedure to add new fields:
Procedure
Before starting, as a precaution, make a backup of the UserInfoConfig.xml file.
- Edit the UserInfoConfig.xml file.
- Locate the Details section.
- Locate the Telephone entry and add the mobile number:
<Detail Id="Telephone" FieldName="telephoneNumber,mobile" Type="text/plain" DisplaySeparator=" / " />
- Before the </Details> tag, add two new fields as follows:
<Detail Id="State" FieldName="stateOrProvince" Type="text/plain"/>
<Detail Id="City" FieldName="city" Type="text/plain"/>
- Locate the ParamsSets section and add the new fields:
<ParamsSets>
  <Set SetId="0" params="MailAddress,Name,Title,Location,Telephone,Photo,Company,City,State"/>
  <Set SetId="1" params="MailAddress,Name,Title,Location,Telephone,Photo,Company,City,State"/>
</ParamsSets>
- Save and close the file.
The final file looks as follows:
  <Details>
     <Detail Id="MailAddress" FieldName="mail" Type="text/plain"/>
     <Detail Id="Name" FieldName="cn" Type="text/plain"/>
     <Detail Id="Title" FieldName="title" Type="text/plain"/>
     <Detail Id="Location" FieldName="postalAddress" Type="text/plain"/>
     <Detail Id="Telephone" FieldName="telephoneNumber,mobile" Type="text/plain" DisplaySeparator=" / " />
     <Detail Id="Company" FieldName="ou" Type="text/plain"/>
     <Detail Id="Photo" FieldName="jpegPhoto" Type="image/jpeg"/>
     <Detail Id="State" FieldName="stateOrProvince" Type="text/plain"/>
     <Detail Id="City" FieldName="city" Type="text/plain"/>
    </Details>
  </Storage>
</Resources>
<ParamsSets>
  <Set SetId="0" params="MailAddress,Name,Title,Location,Telephone,Photo,Company,City,State"/>
  <Set SetId="1" params="MailAddress,Name,Title,Location,Telephone,Photo,Company,City,State"/>
</ParamsSets>
Listing 3: Result of modifications to UserInfoConfig.xml
- Restart the Sametime Community Server.
To test the changes in UserInfoConfig.xml, you can check the result returned by the UserInfoServlet.
In a browser, go to:
http://<Sametime_Server>/servlet/UserInfoServlet?operation=3&setid=2&userid=<Test_Account_Name>
where:
| Parameter | Description |
|---|---|
| operation | Operation to be performed. Use the value 3. |
| setid | Parameter set to be returned, defined in the ParamsSets section of UserInfoConfig.xml |
| userid | Lookup key |
Example:
http://stserver/servlet/UserInfoServlet?operation=3&setid=2&userid=uid=ebasso
Where the result is:
<?xml version="1.0" encoding="UTF-8"?>
<userinfo>
  <user id ="uid=ebasso">
   <field name="MailAddress" type="" error="UNAVAILABLE"/>
   <field name="Name" type="text/plain">Enio Rubens Basso</field>
   <field name="Title" type="text/plain">IT Specialist</field>
   <field name="Location" type="" error="UNAVAILABLE"/>
   <field name="Telephone" type="text/plain">61-3333-4444 / 61-9999-9999</field>
   <field name="City" type="text/plain">Brasilia</field>
   <field name="State" type="text/plain">DF</field>
  </user>
</userinfo>
Listing 4: Servlet return
As you can see, if an attribute value in LDAP is not populated, UserInfoServlet returns error="UNAVAILABLE".
Adding Fields from the Company HR System
To address the second challenge from the Marketing department, the Sametime Administrator needs to retrieve information from the Company's HR System.
To avoid querying the HR System constantly, we will create a local repository to store the information to be displayed on the Sametime Business Card.
To perform this task, we need to complete 3 activities:
- Create the local repository
- Import data from the HR System
- Configure UserInfoConfig.xml
As a prerequisite, you need to have Domino Designer installed on your computer and configured to access the Sametime Community server. Use the Sametime Administrator account to avoid restrictions when creating the database and running operations on the server.
2.1. Creating the Local Repository
We will create a Notes application (NSF) to store the data.
- Open Domino Designer
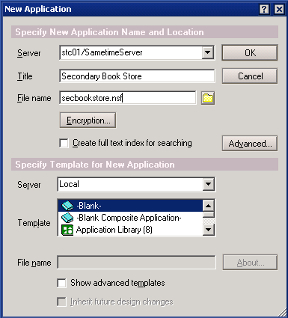
- Create a new database via the menu File -> Application -> New
Fill in the following fields:
| Field | Value |
|---|---|
| Server | <Sametime Server Name> |
| Title | Secondary Book Store |
| File name | secbookstore.nsf |
| Server | Local |
| Template | Select -Blank- |
Click OK
Figure 4: Dialog Box for creating a new application
Creating the Form
- Create a new form via Create -> Design -> Form
| Field | Value |
|---|---|
| Name | person |
| Alias | person |
| Comment | |
| Application | Secondary Book Store:\\<Sametime Server Name> |
Click OK
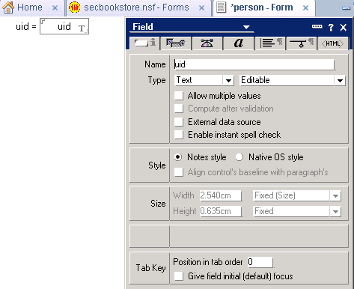
- Create the key field named uid via Create -> Design -> Field
Enter uid for Name and set Type to Text.
Figure 5: Dialog box to create a new field
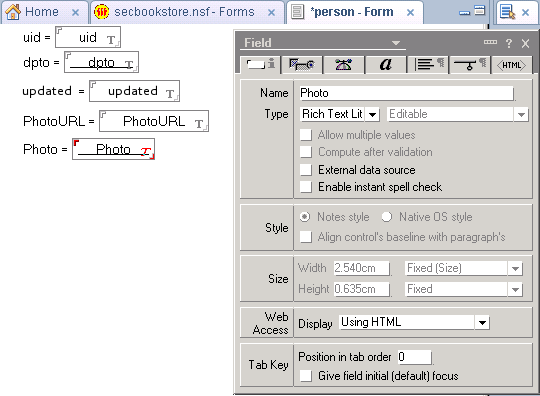
- Create the remaining fields used in this article:
| Field Name | Type | Description |
|---|---|---|
| dpto | Text | Department |
| updated | Text | Photo update date |
| PhotoURL | Text | Image URL |
| Photo | Rich Text Lit | Image file |
Save the form via File -> Save.
Figure 6: New fields created
Creating the Index View
- Create a new view via Create -> Design -> View
Fill in:
| Field | Value |
|---|---|
| View Name | vwIndex |
| View Type | Shared |
| Selection Formula | By Formula |
| Select Conditions | Select @All |
Click Save and Customize
Figure 7: Dialog box to create a view
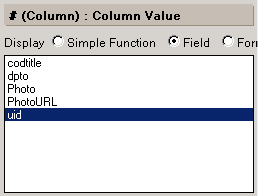
- Click the column #, select Field, and choose uid.
Figure 8: Setting the column value
- In the properties dialog, click the second tab and under Sort, select Ascending.
Figure 9: Setting the sort order
Save the view via File -> Save.
Now we have a local secondary repository.
2.2. Importing Data from the HR System
The Company HR System is stored in a DB2 database.
In this section, we will create a Java agent to retrieve information from the SQL database and populate the local NSF repository.
The agent is divided into 5 parts:
- Defining variables
- Initializing the DB2 JDBC Driver
- Executing the query
- Creating or updating documents in the NSF repository
- Main method
Preparation
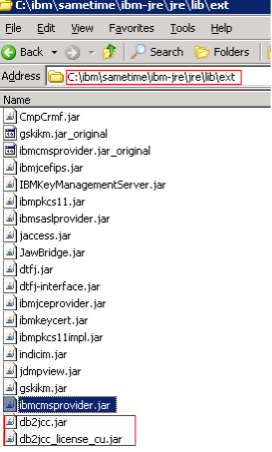
To access DB2, we must add the DB2 JDBC (type 4) drivers.
Copy the following files into <DOMINO_INSTALL_DIR>\ibm-jre\jre\lib\ext:
- db2jcc.jar
- db2jcc_license_cu.jar
Figure 10: DB2 JDBC driver configuration
Procedure
- Create a new agent via Create -> Design -> Agent
| Field | Value |
|---|---|
| Name | ImportPersonInfo |
| Alias | ImportPersonInfo |
| Comment | |
| Type | Java |
| Application | Secondary Book Store:\\<Sametime Server Name> |
Click OK
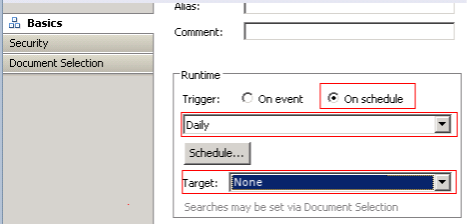
- In Basics, set On Schedule -> Daily, and Target to None.
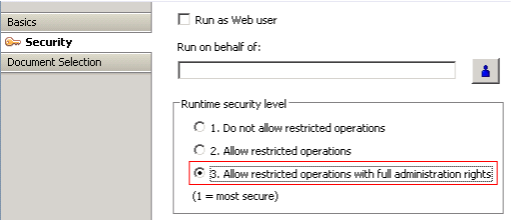
- In Security, select 3. Allow restricted operations with full administration rights.
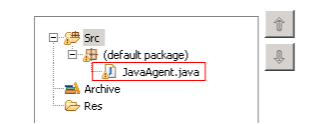
- Click on JavaAgent.java to create the code.
- In the JavaAgent class, define the DB2 connection constants and global variables:
// CONSTANTS
private static final String JDBC_CLASS = "com.ibm.db2.jcc.DB2Driver";
private static final String JDBC_URL = "jdbc:db2://db2srv.empresax.com.br:50000/RHS";
private static final String JDBC_USERID = "STUSER";
private static final String JDBC_PASSWORD = "STUSER";
private static final String UID_LOOKUP_VIEW_NAME = "vwIndex";
private static final String SQL =
"SELECT UID, DPTO " +
"FROM EMPLOYEE " +
"ORDER BY UID";

// GLOBAL VARIABLES
Connection con;
String uid = "";
String dpto = "";
- Initialize the DB2 JDBC Driver:
private void initDB() throws Exception {
 Class.forName(JDBC_CLASS).newInstance();
 con = DriverManager.getConnection(JDBC_URL, JDBC_USERID, JDBC_PASSWORD);
}
- Execute the query:
private void runMain(Database db) throws Exception {
 Statement stmt = con.createStatement();
 System.out.println("runQuery - start");
 ResultSet rs = stmt.executeQuery(SQL);
 System.out.println("runQuery - end");
 int i=0;
 while (rs.next()) {
   if (++i % 1000 == 0) System.out.println("Iterating: " + i);
   uid = rs.getString("UID");
   if (uid == null) uid = "";
   dpto = rs.getString("DPTO");
   if (dpto == null) dpto = "";
   updateOrCreateDocument(db,uid);
 }
 stmt.close();
 System.out.println("Total: " + i);
}
- Create or update documents in the NSF repository:
private void updateOrCreateDocument(Database db, String key) throws Exception {
 View view = db.getView(UID_LOOKUP_VIEW_NAME);
 Document doc = null;
 boolean saveDoc = false;
 doc = view.getDocumentByKey(key, true);
 if (doc == null){
   doc = db.createDocument();
   doc.replaceItemValue("Form","person");
   doc.replaceItemValue("uid", uid);
   doc.replaceItemValue("dpto", dpto);
   saveDoc = true;
 } else {
   if (!uid.equals("") && !uid.equals(doc.getItemValueString("uid"))){
     doc.replaceItemValue("uid", uid); saveDoc = true;
   }
   if (!dpto.equals("") && !dpto.equals(doc.getItemValueString("dpto"))){
     doc.replaceItemValue("dpto", dpto); saveDoc = true;
   }
 }
 if (saveDoc) doc.save(true, false, true);
 doc.recycle();
 view.recycle();
}
- In the main method NotesMain, call the other methods:
public void NotesMain() {
 try {
   Session session = getSession();
   AgentContext agentContext = session.getAgentContext();
   Database notedDb = agentContext.getCurrentDatabase();
   System.out.println("ImportPersonInfo - start");
   initDB();
   runMain(notedDb);
   System.out.println("ImportPersonInfo - end");
 } catch(Exception e) {
   e.printStackTrace();
 }
}
2.3. Configuring UserInfoConfig.xml to Use the Local Repository
As a prerequisite, there must be a primary key shared between the LDAP repository and the NSF repository. In this case, the uid field will contain the same values.
- Edit the UserInfoConfig.xml file
- Locate the </Storage> tag and add the new repository:
<Storage type="NOTES_CUSTOM_DB">
<StorageDetails DbName="secbookstore.nsf" View="vwIndex"/>
<Details>
<Detail Id="Dpto" FieldName="Dpto" Type="text/plain"/>
<Detail Id="PhotoURL" FieldName="PhotoURL" Type="text/plain"/>
<Detail Id="Photo" FieldName="photo" Type="image/jpeg"/>
</Details>
</Storage>
- Locate the <ParamsSets> section and add the new fields:
<ParamsSets>
  <Set SetId="0" params="MailAddress,Name,Title,Location,Telephone,Photo,Company,City,State,Dpto"/>
  <Set SetId="1" params="MailAddress,Name,Title,Location,Telephone,Photo,Company,City,State,Dpto"/>
</ParamsSets>
- Locate the <BlackBoxConfiguration> section and add the new blackbox:
<BlackBox type="NOTES_CUSTOM_DB" name="com.ibm.sametime.userinfo.userinfobb.UserInfoNotesCustomBB" MaxInstances="4"/>
- Save and close the file
- Restart the Sametime Community server
3. Displaying the User Photo Stored in IBM Connections Profile
Finally, we will use photos stored in IBM Connections Profiles to display them in IBM Sametime.
In IBM Connections, profile photos are stored in the database, in the table EMPINST.PHOTO. Direct access to profile tables is not officially supported by IBM, but we will use it in this article.
We will add 2 main fields:
- Photo: A RichText field used to store the binary photo used by the Sametime Connect Client
- PhotoURL: URL of the photo used by the Sametime Web Client (Sametime Proxy)
To avoid comparing two files, we create the updated field, which stores the date when the photo was last updated.
3.1. Importing Photos from IBM Connections
Our agent is divided into 6 parts:
- Defining variables
- Initializing the DB2 JDBC Driver
- Executing the query
- Creating the image file
- Creating or updating the document in the NSF repository
- Main method
Since it follows the same approach as the previous section, we will only show the differences.
Procedure
- Create a new agent via Create -> Design -> Agent
| Field | Value |
|---|---|
| Name | ImportPhotosConnections |
| Alias | ImportPhotosConnections |
| Comment | |
| Type | Java |
| Application | Secondary Book Store:\\<Sametime Server Name> |
Click OK
Repeat steps 2, 3, 4 from section 2.2.
- In the JavaAgent class, add new DB2 connection constants and global variables:
private static final String PHOTOS_TEMP_DIRECTORY = "c:\\temp\\photos\\img_";
private static final String PHOTO_URL_PREFIX = "http://connections.companyx.com.br/profiles/photo.do?uid=";
private static final String SQL =
        "SELECT E.PROF_UID UID, P.PROF_UPDATED UPDATED, P.PROF_IMAGE IMAGE " +
        "FROM EMPINST.PHOTO P, " +
        "EMPINST.EMPLOYEE E " +
        "WHERE P.PROF_KEY=E.PROF_KEY";

String updated = "";
byte[] photo_bytes;
PHOTOS_TEMP_DIRECTORY stores the temporary directory for the photos. PHOTO_URL_PREFIX stores the URL to retrieve photos from IBM Connections.
Repeat step 6 from section 2.2.
- Execute the query
For each row returned by the SELECT, create a user photo file in the temporary directory using the createImageFile method, then call updateOrCreateDocument.
private String createImageFile(String uid) throws Exception {
 String filename = PHOTOS_TEMP_DIRECTORY + uid + ".jpg";
 File outFile = new File(filename);
 FileOutputStream fos = new FileOutputStream(outFile);
 fos.write(photo_bytes);
 fos.close();
 return filename;
}

private void runMain(Database db) throws Exception {
 Statement stmt = con.createStatement();
 System.out.println("runQuery - start");
 ResultSet rs = stmt.executeQuery(SQL);
 System.out.println("runQuery - end");
 int i=0;
 System.out.println("Iterating: " + i);
 while (rs.next()) {
   if (++i % 1000 == 0) System.out.println("Iterating: " + i);
   uid = rs.getString("UID");
   if (uid == null) uid = "";
   updated = rs.getString("UPDATED");
   photo_bytes = rs.getBytes("IMAGE");
   String filename = createImageFile(uid);
   updateOrCreateDocument(db, uid, filename);
 }
 stmt.close();
 System.out.println("Total: " + i);
}
- Creating or updating the document in the NSF repository
Using the primary key stored in the string key, check whether the document exists. If it does not exist, create a new document; otherwise, check for changes and update it.
private void updateOrCreateDocument(Database db, String key) throws Exception {
 View view = db.getView(UID_LOOKUP_VIEW_NAME);
 Document doc = null;
 boolean saveDoc = false;
 doc = view.getDocumentByKey(key, true);
 if (doc == null){
   doc = db.createDocument();
   doc.replaceItemValue("Form","person");
   doc.replaceItemValue("uid", uid);
   doc.replaceItemValue("updated", updated);
   doc.replaceItemValue("PhotoURL", PHOTO_URL_PREFIX + uid);
   photo = doc.createRichTextItem("photo");
   photo.embedObject(EmbeddedObject.EMBED_ATTACHMENT, null, filename, null);
   saveDoc = true;
 } else {
   if (!uid.equals("") && !uid.equals(doc.getItemValueString("uid"))){
     doc.replaceItemValue("uid", uid); saveDoc = true;
   }
   if (!updated.equals("") && !updated.equals(doc.getItemValueString("updated"))){
     doc.replaceItemValue("updated", updated);
     doc.removeItem("photo");
     doc.replaceItemValue("PhotoURL", PHOTO_URL_PREFIX + uid);
     photo = doc.createRichTextItem("photo");
     photo.embedObject(EmbeddedObject.EMBED_ATTACHMENT, null, filename, null);
     saveDoc = true;
   }
 }
 if (saveDoc) doc.save(true, false, true);
 doc.recycle();
 view.recycle();
}
- In the main method NotesMain, call the other methods.
3.2. Configuring UserInfoConfig.xml to Return Photos
- Edit the UserInfoConfig.xml file
- Locate the <Storage> section and add the new fields:
<Storage type="NOTES_CUSTOM_DB">
<StorageDetails DbName="secbookstore.nsf" View="vwIndex"/>
<Details>
  <Detail Id="Dpto" FieldName="Dpto" Type="text/plain"/>
  <Detail Id="PhotoURL" FieldName="PhotoURL" Type="text/plain"/>
  <Detail Id="Photo" FieldName="photo" Type="image/jpeg"/>
</Details>
</Storage>
- Save and close the file
- Restart the Sametime Community server
Conclusion
This article described how to extend IBM Sametime to provide user information stored in various repositories. We showed how to create a custom repository by retrieving information from other sources, such as an SQL database, and importing photos from IBM Connections profiles.
If you have an IBM Sametime Community Server cluster, simply create a replica of the secbookstore.nsf database and copy the UserInfoConfig.xml file to the other servers.
I hope this article is useful in your day-to-day work as a Sametime Administrator.
Ver também

